How to Install a Roof Top Tent? Step-by-Step Guide for Beginners
Ever pulled into a remote campsite after dark, wishing your bed was already set up above the mud? A rooftop tent makes that possible but only if it’s mounted correctly. To install a roof top tent, follow these steps:
- Check your roof rack’s dynamic and static load rating
- Gather tools: torque wrench, spanners, thread locker, spirit level
- Measure and mark bracket positions on your crossbars
- Lift the tent onto the rack with a second person
- Slide mounting brackets into the T-slot and hand-tighten all bolts first
- Torque bolts to manufacturer spec (typically 25–35 Nm)
- Check the tent is level side-to-side and front-to-back
- Open and close the tent to test before driving
- Re-torque all bolts after your first 50–100 km
It sounds straightforward, but plenty of beginners get tripped up on load ratings, bolt alignment, and skipping that final re-torque after the first drive. Done right, the whole job takes under 90 minutes with just a few basic tools. This guide walks you through every step from checking your rack is actually rated for the job, to hitting the road with confidence.
What Is a Roof Top Tent and How Does the Mounting System Work?
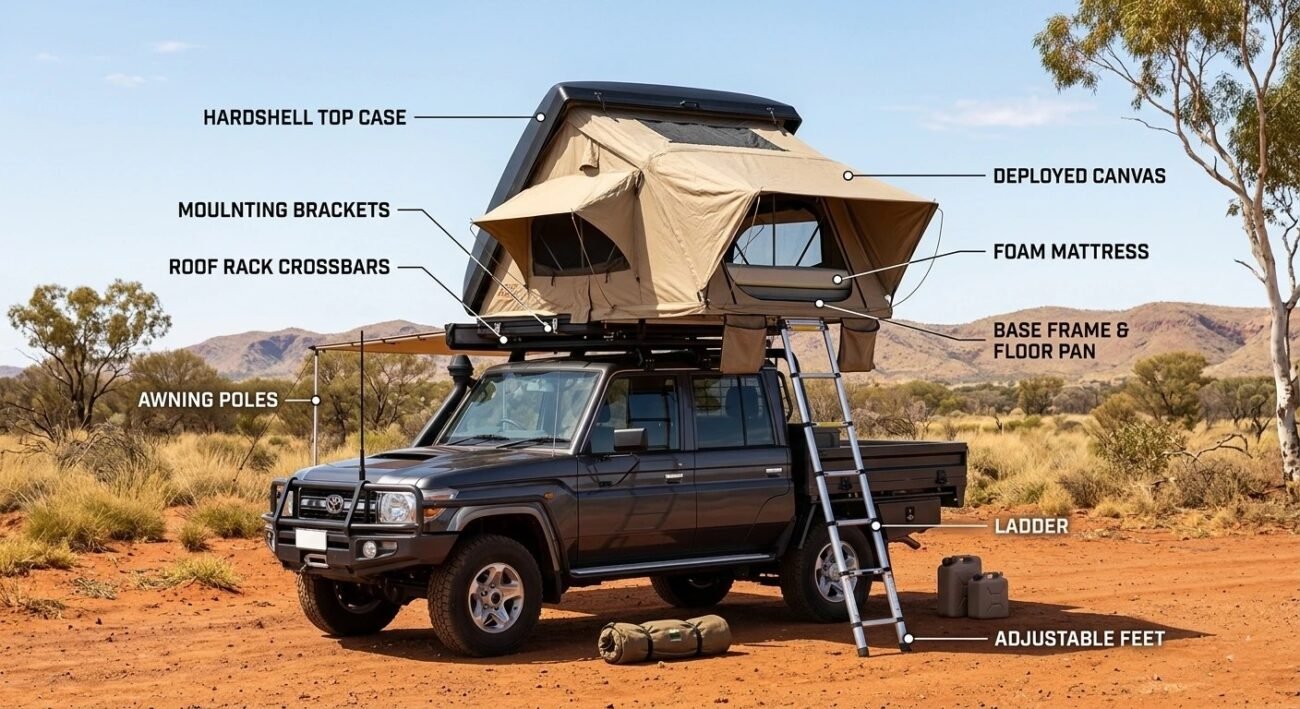
A rooftop tent is a sleeping shelter that mounts directly onto your vehicle’s roof rack. Unlike a ground tent, it keeps you completely elevated off the terrain. That means no wet ground, no uneven surfaces under your back, and no unexpected wildlife visiting overnight. Most rooftop tents have a hard or soft base frame, a folding sleeping platform, and a waterproof canvas shell.
The mounting system works by connecting the tent’s base frame to your rack’s crossbars using brackets. Most tents use T-bolts, U-bolts, or clamp-style brackets that slide into the crossbar’s T-slot channel. You then lock them into position with bolts from underneath. Some brands use a direct clamp system that grips the crossbar from above instead.
What makes the whole system reliable is three things working together: bracket grip, correct bolt torque, and your rack’s rated load capacity. If any one of those is off, the tent will shift during highway driving. Quality brands like iKamper, CVT, and Bush Company precision-drill their base frames for consistent bracket placement every time. That consistency is what separates a safe setup from a sketchy one.
Does Your Vehicle’s Roof Rack Actually Suit a Rooftop Tent?
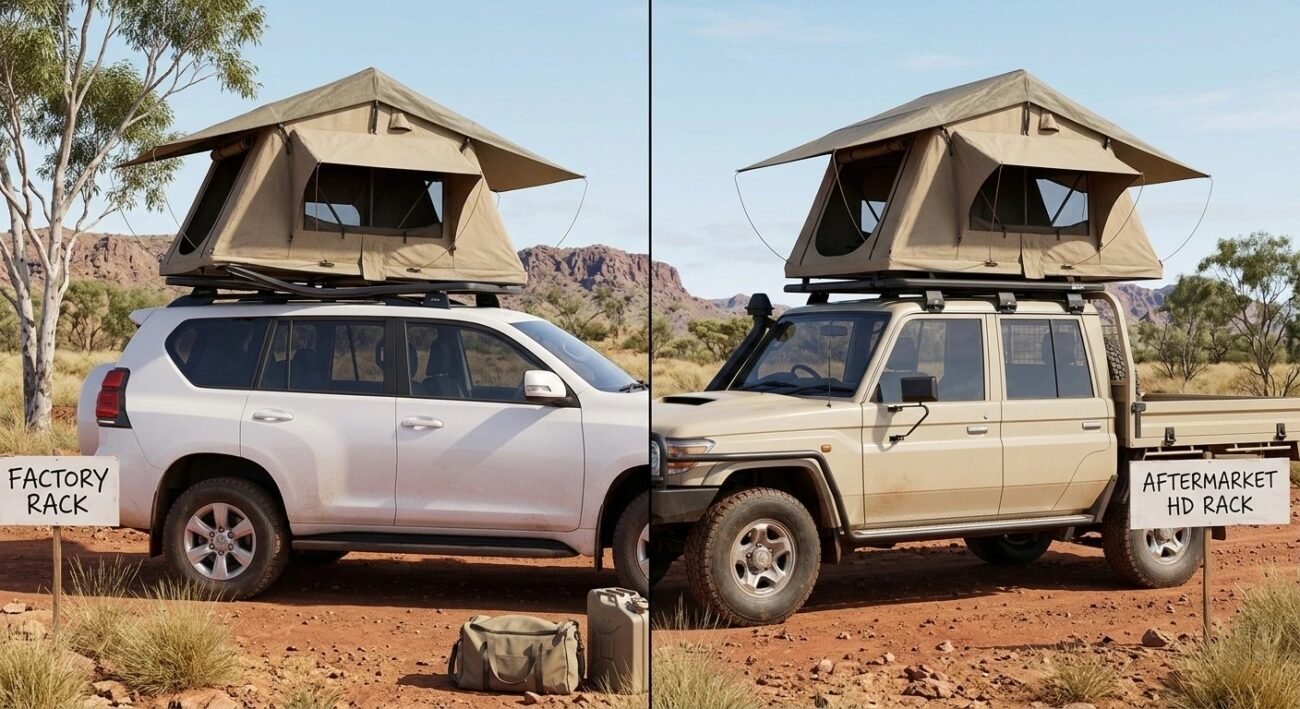
Not every roof rack is built for a rooftop tent, even if it looks heavy-duty and solid. This is the part most beginners skip entirely, and it causes real problems on Australian roads.
You need to check two specific numbers before committing to any purchase. The first is the dynamic load rating, which is the maximum weight your rack carries while the vehicle is moving. The second is the static load rating, which covers weight capacity when the vehicle is parked. Most rooftop tents weigh between 35 and 65 kilograms. Your dynamic rating must comfortably exceed that figure, because corrugated outback tracks multiply the effective stress on your rack significantly.
Factory-fitted roof racks from vehicle manufacturers are almost never suitable for rooftop tents. Most OEM racks have a dynamic rating of only 50 to 75 kilograms. That is marginal at best on smooth bitumen, and genuinely dangerous on rough terrain. Purpose-built racks from ARB, Rhino-Rack, and Thule are specifically engineered for RTT loads and Australian conditions. Always read the rack manufacturer’s specification sheet before buying your tent. Getting this wrong is a costly and potentially dangerous mistake.
What Tools and Gear Do You Need Before You Start?
Getting your tools sorted before you start saves you from stopping halfway through the install. I have seen plenty of people begin without a torque wrench and wonder why their tent shifts after the first corrugated track. The right tools make a genuine difference to how safe and secure the final mount is.
| Tool | Usage | Approx. Price (AUD) |
|---|---|---|
| Torque wrench (3/8″ drive) | Tightens mounting bolts to exact spec (25-35 Nm) | $45 – $120 |
| Socket set (10mm – 19mm) | Loosens and tightens all mounting hardware | $30 – $85 |
| Thread locker (Loctite 243) | Stops bolts vibrating loose on rough outback roads | $10 – $15 |
| Spirit level or phone level app | Confirms tent sits level after mounting | $0 – $20 |
| Step ladder (1.2m – 1.5m) | Provides safe access to roof rack height | $40 – $100 |
| Tape measure | Centres tent accurately on crossbars | $10 – $20 |
| Masking tape or marker | Marks bracket positions before lifting the tent | $3 – $10 |
| Rubber mat or protective rags | Protects rack finish and paintwork during the lift | $5 – $15 |
Thread locker is the one item most guides skip completely. Vibration on Australian outback roads will slowly back out your bolts over time without it. Apply it to every bolt thread before final tightening, and your mount stays solid for years.
Can You Install a Roof Top Tent Solo or Do You Need a Mate?
Installing Solo
Solo installation is possible, but it depends entirely on the tent’s weight and your physical fitness. Softshell tents under 35 kilograms can be managed alone with the right technique. Lean one end of the tent base onto the rack first, then pivot the opposite end up carefully. A rubber-padded step ladder protects your paintwork during the process.
Always close and latch the tent completely before attempting a solo lift. An open tent shell creates awkward weight distribution that makes solo lifting genuinely unsafe. Move slowly, take breaks between lifts, and never rush the alignment step.
Installing With a Mate
A two-person install is the recommended approach for any tent above 35 kilograms. One person lifts each end simultaneously, which keeps the load balanced and prevents the base from twisting. The second person also manages alignment, which is nearly impossible to judge accurately when you are physically holding the tent yourself.
For hardshell tents weighing between 45 and 65 kilograms, two people is not optional. Split the roles clearly before you start: one person manages tent positioning, the other handles brackets, alignment marks, and bolts. That division keeps the job clean, fast, and safe.
How Do You Install a Roof Top Tent Step by Step?
Before touching a single bolt, run through this quick overview. It gives you a clear picture of the full process and how long each stage actually takes.
| Step | Action | Estimated Time |
|---|---|---|
| 1 | Measure and mark bracket positions | 10-15 mins |
| 2 | Lift the tent onto the rack | 5-10 mins |
| 3 | Slide and align mounting brackets | 10-15 mins |
| 4 | Hand-tighten all bolts evenly | 5 mins |
| 5 | Torque to spec and level check | 10-15 mins |
| 6 | Test open and close before driving | 10 mins |
| Total | 50-70 mins |
Step 1: Position and Measure the Mounting Brackets on the Rack
This step is the most underestimated part of the whole install. Most beginners skip straight to lifting, then spend 20 minutes shuffling brackets around awkwardly.
Start by placing your mounting brackets on the crossbars without the tent attached. Measure the crossbar spread first. Most rooftop tents require a minimum crossbar spread of 600mm to 900mm for stable support. Check your tent’s manual for the exact requirement.
Next, find the centre point of your crossbars and mark it with masking tape. Then measure equal distances from that centre mark for each bracket position. This keeps the tent centred over your vehicle’s roof, which protects your handling at highway speeds.
Check these key measurements before lifting anything:
- Crossbar spread matches tent manufacturer’s minimum requirement
- Bracket positions are equal distance from roof centre
- No brackets are sitting over a T-slot join or weak point
- Tape marks are clear and visible from above
Centring the tent properly also distributes weight evenly across both crossbars. An off-centre tent loads one crossbar significantly more than the other. Over time, that uneven load stresses the rack mounting feet and can cause rack movement on corrugated roads.
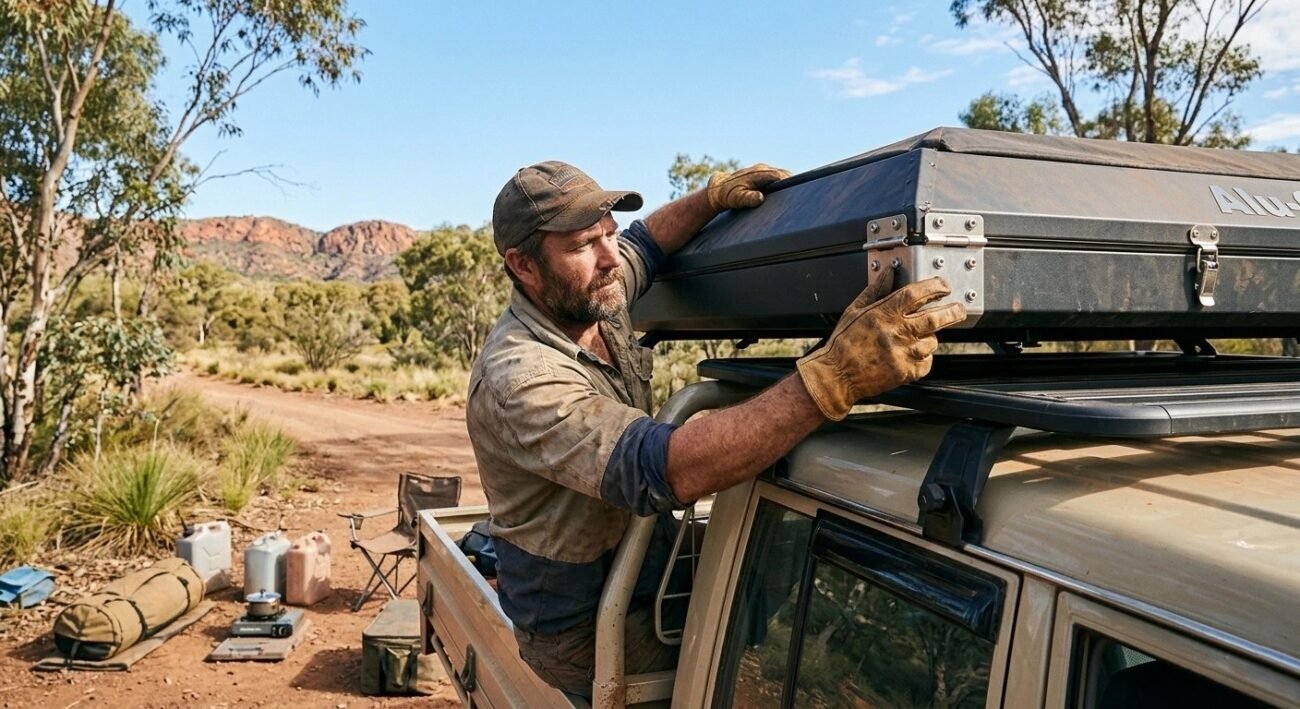
Step 2: Lift the Tent onto the Roof Rack Safely
This is the step that causes the most injuries and paintwork damage. Rushing this stage costs you money and possibly a trip to the panel beater.
For tents between 35 and 55 kilograms, you need two people positioned at opposite ends. One person lifts each end simultaneously, keeping the base frame perfectly horizontal. A twisted lift binds the bracket slides and makes alignment much harder later.
Before lifting, wrap your rack crossbars with rubber mats or old towels. This protects the crossbar finish and your vehicle’s roof from scratches during the shuffle. It takes 30 seconds to do and saves real grief.
Follow this lift sequence:
- Both lifters grip the tent base frame, not the canvas shell
- Lift together on a three count, keeping the base level
- Rest the near edge onto the crossbar first
- Pivot the far end up and onto the second crossbar
- Slide the tent roughly into position before releasing your grip
For hardshell tents above 55 kilograms, use a workshop step ladder on each side. It reduces the lift height significantly and protects your lower back. I have seen people skip this and regret it immediately.
Step 3: Slide and Align the Mounting Brackets
Once the tent is resting on the rack, alignment is your only focus. Do not rush to insert bolts before you are completely satisfied with the positioning.
Slide each mounting bracket into the T-slot channel on your crossbar. Most quality racks from ARB, Rhino-Rack, and Thule use a standard T-slot profile. The bracket nut drops into the channel and sits flush when correctly seated.
Check these alignment points before touching a single bolt:
- Tent base sits flat across both crossbars with no rocking
- All brackets are fully seated in the T-slot channel
- Tent position matches your tape marks from Step 1
- Equal overhang on each side of the vehicle
- Tent opening faces the rear of the vehicle for ladder access
The rear-facing position is worth mentioning specifically. A tent that opens toward the front creates serious wind resistance issues at speed. It also puts your ladder in a dangerous position relative to passing traffic. Always mount with the opening facing the rear.
Once alignment looks correct, gently push down on each corner of the tent base. If any corner lifts off the crossbar under pressure, your bracket positioning needs adjustment before you proceed further.
Step 4: Insert and Hand-Tighten All Bolts First
This step is where most beginners make a critical mistake. They fully tighten one bolt, then move to the next. That approach warps the base frame and misaligns the entire mount.
The correct method is to hand-tighten every single bolt before applying any tool torque at all. This keeps the base frame floating slightly, which allows it to self-align naturally across the crossbars.
Apply thread locker to each bolt before insertion. Loctite 243 is the right product for this application. It handles the vibration loads from corrugated Australian outback tracks without permanently locking the bolt. Blue thread locker is removable with standard tools. Red thread locker is not, so avoid it here.
Hand-tighten in this sequence:
- Front-left bracket bolt
- Rear-right bracket bolt (diagonal from front-left)
- Front-right bracket bolt
- Rear-left bracket bolt (diagonal from front-right)
This diagonal sequence is borrowed directly from wheel torque technique. It pulls the base frame down evenly from all four corners simultaneously. Tightening in a circle or straight line across one side first creates uneven clamping pressure across the base.
Once all bolts are hand-tight, check alignment one final time before moving to torque.
Step 5: Torque Bolts to Spec and Do a Level Check
This is the step that actually determines how safe your install is on the road. Finger-tight bolts will not hold at highway speed. Over-torqued bolts strip threads and crack bracket ears.
Most rooftop tent manufacturers specify a torque range of 25 to 35 Newton-metres for M8 mounting bolts. Always check your specific tent manual first. If your manual says nothing, 25 Nm is a safe conservative starting point.
Use a calibrated torque wrench set to the correct value. Torque each bolt using the same diagonal sequence from Step 4:
| Bolt Position | Torque Setting | Check After |
|---|---|---|
| Front-left | 25-35 Nm | Yes |
| Rear-right | 25-35 Nm | Yes |
| Front-right | 25-35 Nm | Yes |
| Rear-left | 25-35 Nm | Yes |
After torquing all bolts, place a spirit level across the tent base in two directions. Check side to side first, then front to back. A level tent sleeps better and also puts equal load on both crossbars during driving.
If the tent is not level, slightly loosen two bolts on the low side and insert a thin rubber shim under the bracket. Retorque and recheck.
Step 6: Test Opening the Tent Before You Drive Anywhere
Never drive to your first campsite without confirming everything works correctly in your driveway. Discovering a problem 400 kilometres from home is a poor situation.
Start by unlocking all cover latches or zip pulls. Open the tent fully and extend the ladder to ground level. Check that the ladder feet sit flat and stable on the ground. A ladder that rocks under load is a genuine safety hazard.
Work through this final checklist before driving:
- Tent opens and holds its position without assistance
- Ladder is stable and all hinge locks are engaged
- Interior sleeping platform is flat with no twist
- All cover latches close and lock cleanly
- No unusual creaking from the base frame or brackets
- Tent cover is tight with no loose material flapping
A creaking sound when you push down on the base corner usually means one bracket is not seated fully in the T-slot channel. Stop, recheck each bracket, and retorque before driving.
Close the tent completely and push firmly down on the cover from above. The tent should feel completely rigid with zero movement. If it shifts at all, recheck bracket alignment and bolt torque before heading out.
How to Take Off a Roof Top Tent?
Taking off a rooftop tent follows a straightforward sequence. Skipping steps is where most people run into trouble.
- Step 1: Open the tent and remove the mattress, bedding, and any stored gear first.
- Step 2: Lay moving blankets over your roof and rear bumper to protect the paint.
- Step 3: Loop two ratchet straps over the tent and through the roof rack rails for support.
- Step 4: Loosen all mounting bolts partially, working diagonally across the base frame.
- Step 5: Remove three bolts completely, leaving the final bolt hand-tight for now.
- Step 6: Confirm both ratchet straps are firm and fully supporting the tent’s weight.
- Step 7: Remove the final bolt slowly while keeping tension on both straps.
- Step 8: Tilt the tent toward the rear of the vehicle and lower it down using the straps.
- Step 9: Slide the tent down the blanketed tailgate and onto your prepared ground mat.
- Step 10: Rest the tent flat on its base frame on a foam mat or padded surface.
The whole process takes 30 to 60 minutes the first time. It gets faster with every removal after that.
For a full breakdown of every step, common mistakes to avoid, and solo removal tips, check out our complete guide on how to iake off a roof top tent.
Best Roof Top Tent in 2026 for Australian
Picking the right rooftop tent for Australian conditions goes beyond price. You need something that handles outback heat, corrugated tracks, and long highway stints. These six tents consistently deliver for Australian overlanders in 2026.
| Product | Type | Price (AUD) | Why Best for Australia | Winner |
|---|---|---|---|---|
| Rigdup 1.8m Hardshell | Hardshell | $3,400 | Aluminium honeycomb base, integrated solar panel, Anderson plug, 260cm ladder for lifted vehicles, aerodynamic shell | 🏆 Top Pick |
| Rigdup 1.4m Softshell | Softshell | $3,200 | 70mm memory foam, 320gsm ripstop canvas, solar ready, suits most mid-size Australian utes | ✅ Good |
| iKamper Skycamp 2.0 | Hardshell | $4,200 | Fast 60-second opening, excellent waterproofing, strong couple-camping option | ✅ Good |
| Darche Panorama 1400 | Softshell | $1,899 | Trusted Australian brand, budget-friendly, solid canvas for outback use | ✅ Good |
| 23Zero Walkabout 56 | Hardshell | $3,100 | Low aerodynamic profile, great for highway fuel economy | ✅ Good |
| Bush Company AX27S | Softshell | $1,650 | Lightweight entry-level option, ideal for solo Australian travellers | ✅ Good |
The Rigdup 1.8m wins on real-world Australian value. Integrated solar and Anderson plug make it genuinely self-sufficient off-grid. The aluminium honeycomb base handles corrugated outback tracks far better than standard pressed steel bases.
How Do You Know If Your Roof Top Tent Is Mounted Safely?
Most people tighten the last bolt and immediately load their camping gear. Running a proper safety check first takes five minutes and prevents real problems on the road.
Work through every point on this list before driving:
- Push down firmly on each corner of the tent base. Any movement means a bracket is not fully seated.
- Grab the tent from each side and attempt to rock it. The rack should absorb the force completely.
- Check every bolt for thread locker residue. Dry threads mean Loctite 243 was skipped entirely.
- Confirm all brackets are fully seated inside the T-slot channel with no visible gap underneath.
- Place a spirit level across the base. Side tilt beyond 3 degrees needs correction before driving.
- Open the tent fully and verify ladder hinge locks engage with a firm, solid click.
- Inspect base frame corners for cracks, particularly around bracket mounting holes.
- Close the tent and press down firmly on the cover. Zero flex means the mount is solid.
- Check all cover latches click and hold without loose play.
- Confirm you have scheduled a re-torque check after the first 50 to 100 kilometres.
How Do You Open and Close a Roof Top Tent Properly at the Campsite?
Getting the sequence right protects the tent mechanism and makes campsite setup genuinely fast.
Opening the Tent:
- Park on the flattest ground you can find. An unlevel surface makes closing significantly harder later.
- Unlock every external cover latch before attempting to open. Missing one latch tears the cover seal.
- For hardshell tents, stand at the rear and lift the lid firmly using the integrated handle.
- Lock all lid struts into their fully open position. Never leave struts unlatched in any wind.
- Extend the ladder fully until both feet contact the ground evenly.
- Engage all ladder hinge locks before putting any weight on the ladder.
Closing the Tent:
- Fold all bedding completely flat inside the sleeping platform before closing.
- Retract the ladder and fold it flush against the base frame.
- For softshell tents, compress the canvas evenly from the front working backward.
- Lower the hardshell lid slowly and press firmly from each corner until all latches engage.
- Lock every external latch individually. One missed latch on the highway damages the cover permanently.
How Do You Remove a Roof Top Tent When You Don’t Need It?
Removing a rooftop tent properly prevents bracket damage and protects your rack’s T-slot channels for reinstallation.
- Open the tent fully to access the base frame and all mounting hardware from above.
- Photograph your bracket positions before removing anything. This eliminates remeasuring on reinstallation.
- Apply masking tape marks alongside each bracket on the crossbar as a reinstallation reference.
- Loosen all bolts using diagonal sequence, starting from opposite corners first.
- Remove all bolts completely and store them in a small ziplock bag immediately.
- Slide each bracket out of the T-slot channel without forcing or dragging them sideways.
- Position your second person at the opposite end before any lifting begins.
- Lift the tent off the rack keeping the base frame completely level throughout.
- Store the tent on a flat surface with the base facing down. Never rest it on the canvas shell.
- Fit end caps over the T-slot channels on your crossbars to keep dirt and moisture out.
Does a Rooftop Tent Affect Fuel Economy and Handling?
Most tent manufacturers avoid this question. The honest answer is yes, and the numbers are significant.
Australian testing data from the RACQ and the 4WD overlanding community shows rooftop tents increase fuel consumption between 10 and 20 percent. The exact increase depends on your driving speed and tent type.
A closed hardshell tent at 100 kilometres per hour increases fuel use by 10 to 12 percent. An open softshell tent at the same speed pushes that figure up to 20 percent because the canvas profile catches substantial air.
Real-world Australian data shows a Toyota LandCruiser 200 Series averaging 13.5L per 100km without a tent fitted. The same vehicle with a hardshell tent averages 15 to 16L per 100km at highway speed. Over a 3,000 kilometre trip, that adds roughly $180 to $220 in extra fuel costs at current Australian prices.
Handling changes noticeably too. A 50 kilogram load sitting at roof height raises the vehicle’s centre of gravity. Cornering at speed feels heavier through the steering wheel. Driving at 100km/h rather than 110km/h reduces both the fuel penalty and the handling effect significantly.
What Are the Most Common Rooftop Tent Installation Mistakes to Avoid?
Knowing these mistakes before you start is the difference between a safe install and a dangerous one.
- Skipping the rack load rating check. A rack rated at 75kg dynamic cannot safely carry a 55kg tent at speed.
- Lifting tents above 35 kilograms solo. Back injuries from solo lifts on heavy hardshells are completely avoidable.
- Fully tightening one bolt before others are hand-tight. This warps the base frame and misaligns the entire mount.
- Forgetting thread locker on mounting bolts. Australian corrugated tracks vibrate bolts loose within a single trip without Loctite 243.
- Mounting the tent off-centre on the crossbars. Uneven weight distribution stresses one crossbar significantly more over time.
- Ignoring the manufacturer’s torque specification. Both under-torquing and over-torquing cause real problems on Australian roads.
- Skipping the re-torque after the first 50 to 100 kilometres. Vibration settling loosens even correctly torqued hardware initially.
- Mounting the tent opening facing forward. Wind resistance damages canvas and creates serious noise issues at highway speed.
- Using red thread locker instead of blue Loctite 243. Red bonds permanently and makes future removal nearly impossible without heat.
Can You Install a Rooftop Tent on a Ute Tray, Canopy, or Soft-Top?

Your vehicle platform determines your mounting options significantly. Not every surface handles a rooftop tent safely.
A bare ute tray requires a load spreader plate bolted across the tray floor before fitting brackets. Without one, the tent concentrates its full weight onto the tray ribs. Those ribs flex and fatigue on rough terrain. Quality aluminium trays from Norweld and Outback Accessories handle RTT loads correctly when a spreader plate is used.
A hard canopy is the most common ute-based mounting platform across Australia. Canopies from RSI, Mountain Top, and Aeroklas are engineered with roof load ratings that suit most rooftop tents. Always check the specific canopy manufacturer’s roof rating before committing. Ratings vary significantly between brands and models.
A soft-top 4WD is not a suitable mounting platform. Soft-top Jeep Wranglers and older soft-top Defenders have no rigid roof structure to transfer load properly. Even a lightweight 30 kilogram tent will deform the roof mounting points and pull the soft-top material off its sealing strips permanently.
Does Installing a Roof Top Tent Void Your Vehicle Warranty?
This question makes most dealers nervous. The answer strongly favours Australian consumers under current law.
The Competition and Consumer Act 2010 and Australian Consumer Law both protect you here. A manufacturer cannot void your entire vehicle warranty simply because you fitted an aftermarket accessory. They must prove, with clear evidence, that your specific accessory directly caused the specific failure being claimed.
A correctly rated rack and properly installed tent cannot be blamed for an unrelated engine fault. Any dealer attempting that argument has no legal standing under ACL provisions.
Warranty problems arise only when the accessory directly causes the failure. Fitting a tent to a rack with an insufficient load rating, which then damages roof mounting points, gives the dealer valid grounds to reject that specific claim.
The safest approach is fitting a purpose-built rack from ARB, Rhino-Rack, or Thule through an authorised dealer. These racks carry their own warranties and meet Australian standards. Keep all installation receipts, load rating documentation, and product spec sheets. That paperwork is your protection in any warranty dispute.
Warpping Up
Installing a rooftop tent is genuinely one of the most satisfying upgrades you can make to your 4WD setup. But it only works well when every step is done correctly. Check your rack’s load rating before anything else. Measure and mark your bracket positions before lifting. Hand-tighten all bolts in a diagonal sequence before applying torque. Use Loctite 243 on every bolt thread without exception. Torque to 25 to 35 Newton-metres and do a full level check before closing. Then re-torque again after your first 50 to 100 kilometres on the road.
A solid install takes under 90 minutes and lasts for years across tough Australian terrain. A rushed install can shift on the highway or damage your rack on the first corrugated track you hit. The difference between the two is just preparation and patience.
If you found this guide useful, share it with a mate who is planning their first rooftop tent setup. And if you are still deciding which tent suits your vehicle and budget, check out our full rooftop tent comparison guide for Australian conditions. Learn everything about rooftop tent installation, setup, and maintenance by visiting this complete guide.
FAQs
No, a proper roof rack with rated crossbars is essential. The tent brackets need a solid crossbar to clamp onto. Your vehicle’s bare roof cannot safely support the weight or movement of a rooftop tent while driving.
Most rooftop tents require a minimum crossbar spread of 600mm to 900mm. Always check your specific tent manual for the exact requirement. Insufficient crossbar spread creates dangerous flex in the tent base during driving on rough terrain.
Most purpose-built racks from ARB, Rhino-Rack, and Thule carry a dynamic load rating between 100kg and 150kg. Your tent, plus any gear stored inside, must stay comfortably under that limit for safe highway driving.
Most tents use T-bolt or clamp-style brackets that suit square and T-slot crossbars. Round crossbars need specific adapter clamps. Always confirm crossbar compatibility with your tent brand before purchasing mounting hardware separately.
Rattling usually means under-torqued bolts or missing thread locker. Re-torque all mounting bolts to 25 to 35 Nm and apply Loctite 243 to each thread. Also check that all lid latches are fully closed before driving.
Yes, but your mounting hardware needs to be correctly torqued and treated with thread locker. Check all bolts after every long corrugated section. Aluminium honeycomb base tents like the Rigdup range handle outback vibration better than standard pressed steel bases.
Yes, provided the tent is correctly rated and mounted. Keep children away from the ladder edge during sleep. Most tents with a sleeping area of 210cm by 180cm comfortably fit two adults or two adults with a young child.
Check bolt torque every three to four months of regular use. Inspect bracket seating and thread locker condition before every long trip. Reapply Loctite 243 any time you remove and reinstall the tent on your crossbars.