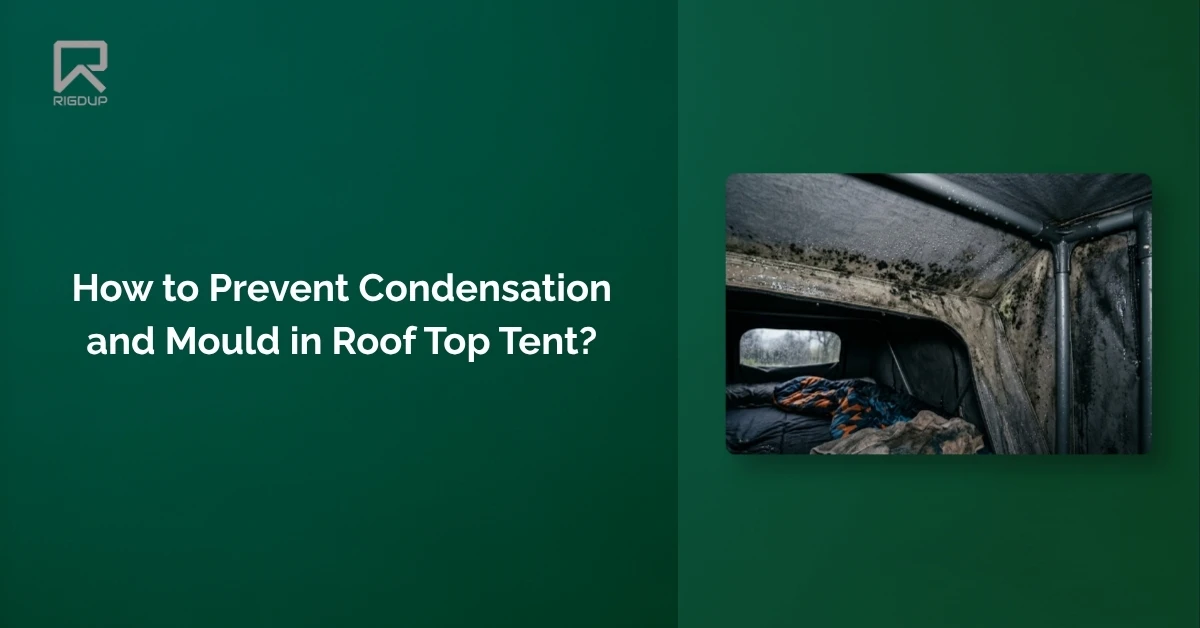
How to Prevent Condensation and Mould in Roof Top Tent?
You wake up inside your rooftop tent, and the walls are dripping wet. Your sleeping bag feels damp, and there’s a musty smell you can’t ignore. Sound familiar? Condensation and mould in a roof top tent is one of the most common problems Aussie campers deal with. The good news? It’s almost entirely preventable. The fix comes down to three things: proper ventilation, smart drying habits, and correct storage. Do those consistently, and mould won’t stand a chance. Here’s exactly what that looks like in practice:
- Open all vents before bed – even in cold weather
- Use cross-ventilation – airflow in one side, out the other
- Wipe down interior surfaces every morning with a dry cloth
- Never cook inside the tent – steam adds significant moisture
- Air the mattress separately – foam traps sweat underneath
- Dry the tent fully before packing down – even 20 minutes in sun helps
- Store in a dry, ventilated space – never seal a damp tent
- Use silica gel packs inside during storage to absorb residual moisture
- Re-proof canvas with a breathability treatment – not just waterproofing spray
- If mould appears, treat with diluted white vinegar – never use bleach on canvas
In this article, you’ll learn exactly why condensation forms, what conditions make it worse, and the step-by-step habits that keep your tent fresh for years.
Why Does Condensation Build Up in a Roof Top Tent?
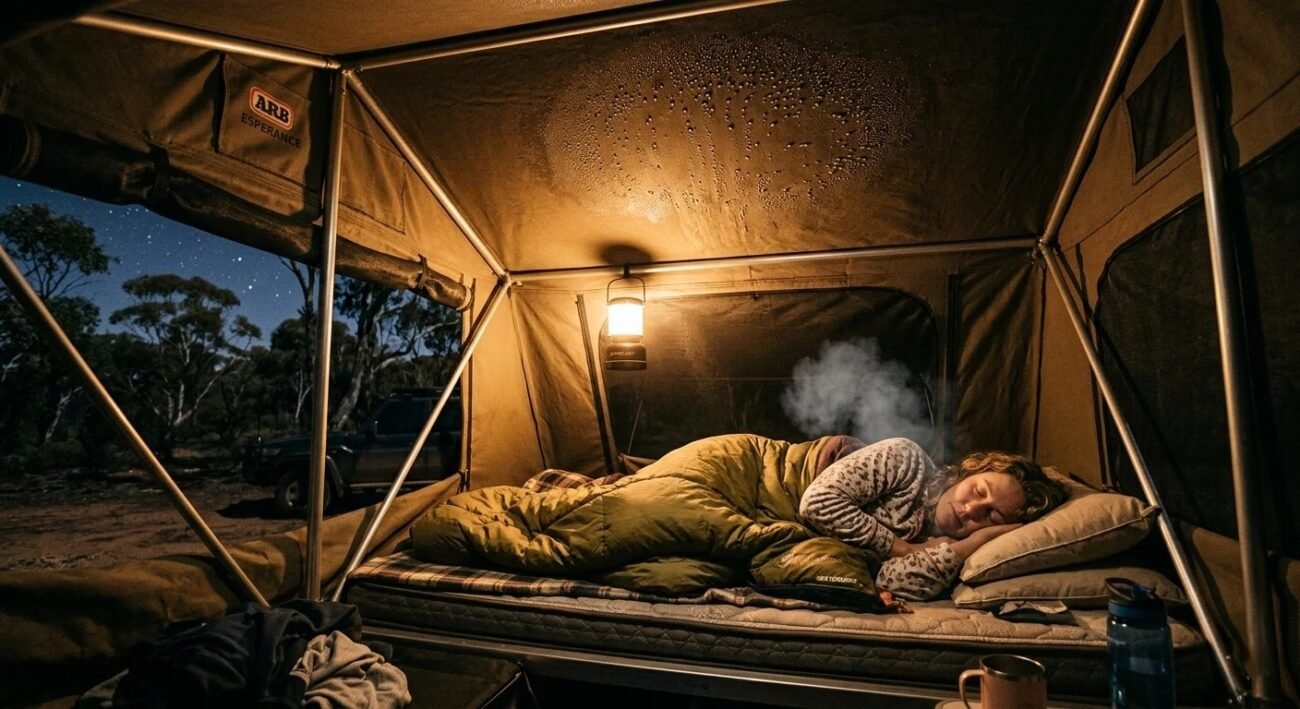
Every time you sleep in your rooftop tent, your body works against you. You breathe out warm, moist air all night. That warm air rises and hits the cold tent walls. When warm air meets a cold surface, it cools rapidly. As it cools, it can no longer hold moisture. That moisture drops out as liquid water. This is basic physics, and there is no escaping it.
Rooftop tents sit elevated above the vehicle. Cold air circulates on all four sides and underneath. Ground tents have soil insulation beneath them. RTTs have none of that. Tent walls get colder, faster. Your body keeps producing heat and moisture throughout the night. The temperature gap between inside and outside grows bigger. The result is more condensation, every single time.
Here is exactly why condensation builds up in a rooftop tent:
- Your body releases roughly one litre of moisture per night through breathing and sweating
- The elevated position exposes all tent surfaces to cold surrounding air
- Poor ventilation traps humid air inside with nowhere to escape
- Synthetic tent fabrics do not breathe, so moisture accumulates on interior walls
- Overnight temperature drops increase the condensation rate significantly
Is Condensation in a Roof Top Tent Normal?
Yes, condensation in a rooftop tent is completely normal. Every camper deals with it at some point. The question is not whether it will happen. The question is how much, and how often.
A light film of moisture on the ceiling after a cold night is expected. That is just physics doing its job. Even the most expensive polycotton canvas RTTs available will show some condensation in the right conditions. Expecting a perfectly dry tent every morning is unrealistic. What matters is how you manage it.
What is not normal is waking up to dripping walls or a soaking mattress every single trip. That level of moisture points to a real problem. Usually it is a ventilation issue. Sometimes it is the camping environment. Occasionally it reflects a breathability problem in cheaper synthetic tents.
I always tell new RTT owners to set realistic expectations early. Some moisture is part of camping life. Your job is to keep it minimal and dry everything before packing down. That one habit stops most mould problems before they even start. Managing condensation well separates a fresh, comfortable tent from a smelly, deteriorating one.
What’s the Difference Between Condensation and a Leak?
Misdiagnosing a leak as condensation is one of the most common mistakes RTT owners make. People reseal their seams, re-proof the fabric, and still wake up wet. That is because they were dealing with condensation all along, not a leak. Getting this diagnosis right saves you time, money, and serious frustration on future trips.
The key difference is where the moisture appears and when it appears. Condensation forms on the inside of surfaces regardless of weather conditions. A leak comes from outside through a specific failure point. Rain, failed seam tape, or a broken zip are the usual culprits for leaks.
Here is a clear breakdown to help you identify which problem you are actually dealing with:
| Feature | Condensation | Leak |
|---|---|---|
| Location | Inside tent surfaces uniformly | Around seams, zips, or entry points |
| When it appears | Any night, rain or dry conditions | Only during or after rainfall |
| Feel | Widespread dampness across walls | Wet patch concentrated in one spot |
| Smell | Musty odour develops over time | Fresh or earthy water smell initially |
| Correct fix | Improve ventilation and airflow | Reseal seams and re-proof fabric |
| Pattern | Even moisture across large areas | Drips or pools from one direction |
How Does Condensation Lead to Mould in a Roof Top Tent?
Condensation on its own is not the enemy. Leaving condensation untreated is what causes real damage. When moisture sits on canvas or fabric for extended periods, it creates the perfect environment for mould spores to activate. Mould spores exist in the air around us constantly. They just need moisture, warmth, and darkness to come alive.
Here is how it typically unfolds. You camp for a weekend and wake up to a damp tent. You are tired and want to get home, so you pack it down wet. The tent sits closed in your garage for a week. Inside, it is dark, warm, and moist. Mould spores get to work within 24 to 48 hours under those conditions.
The first sign is usually a musty smell when you open the tent next time. Then you notice dark spots developing on the fabric. At that stage, mould has already started breaking down the canvas fibres underneath the surface. It weakens the waterproof coating, degrades the material strength, and becomes a genuine health irritant over time. Packing a wet tent away plus poor ventilated storage is the fastest way to ruin an expensive RTT.
Which Conditions Make Condensation Worse?

Not all camping trips carry the same condensation risk. Some conditions push moisture levels far beyond what normal ventilation can handle. Understanding these conditions helps you prepare properly before leaving home, not after you are already soaked.
Coastal and tropical Australia is the hardest environment for RTT users. Think Darwin, Cairns, Broome, or anywhere near open water. The ambient humidity is already high before you add body heat. Add two people sleeping with closed vents, and you have a serious moisture problem well before midnight.
Temperature swings also make things considerably worse. Alpine areas and desert regions experience dramatic drops overnight. The bigger the gap between daytime and nighttime temperatures, the more condensation forms on cold tent walls and fabric surfaces.
These are the main conditions that increase condensation risk inside a rooftop tent:
- High ambient humidity common along Queensland, NT, and WA coastlines
- Camping beside rivers, lakes, or creeks where moisture rises after sunset
- Large overnight temperature swings in alpine and desert environments
- Multiple people sleeping in the same enclosed tent space
- Closed vents or fully sealed tent openings with zero airflow
- Autumn and spring shoulder seasons combining cold nights with warm days
- Synthetic tent fabrics with low breathability compared to polycotton canvas
How Does Stop Condensation in a Roof Top Tent?

Every time you sleep in your rooftop tent, your body is working against you. You breathe out warm, moist air all night long. That warm air rises and hits the cold tent walls above you. When warm air meets a cold surface, it cools down rapidly.
As it cools, it cannot hold that moisture anymore. So it drops out as liquid water on your walls, ceiling, and gear. This is basic physics, and there is no escaping it entirely.
What makes rooftop tents worse than ground tents is their position. A ground tent sits on soil, which holds some warmth and acts as an insulating layer underneath. Your RTT sits elevated on a roof rack with cold air circulating on all four sides, underneath, and above.
Every surface of your tent is exposed to the cold night air simultaneously. This accelerates the cooling process significantly. The temperature gap between the warm air inside and cold surfaces outside grows faster and bigger in an RTT than in any ground tent setup.
There is also the human factor that most people underestimate. A single sleeping adult exhales roughly one litre of moisture every night. Two adults sleeping together push that closer to two litres. Add a wet jacket drying inside, gear that came in damp, or cooking steam that drifted in during dinner, and you have a serious moisture load your tent needs to manage. When ventilation is poor, that moisture has nowhere to go. It just cycles around inside and settles wherever the surface is coldest.
The fabric type plays a big role too. Budget RTTs made from 100% polyester or nylon are not breathable. Moisture cannot pass through those fibres at all. It hits the wall and runs straight down. Quality polycotton canvas, by contrast, allows some moisture vapour to migrate through the weave before it condenses into liquid.
That is why seasoned overlanders consistently recommend polycotton canvas RTTs for Australian conditions. It is not just about durability. It is about managing moisture intelligently at the material level.
Understanding the root cause helps you fix the right thing. Most people blame their tent when the real issue is ventilation habits or camping environment. Here is a clear breakdown of every factor that causes condensation to build up:
Primary Causes of Condensation in a Rooftop Tent:
- Your body releases roughly one litre of moisture per night through breathing and perspiration
- Elevated position exposes all four tent walls to cold surrounding air simultaneously
- No ground insulation beneath the tent floor unlike traditional ground camping setups
- Poor or closed ventilation traps humid air inside with no escape pathway
- Synthetic fabrics like polyester and nylon offer zero breathability for moisture vapour
- Large overnight temperature drops accelerate condensation formation on all surfaces
- Multiple occupants significantly multiply the moisture load inside the tent
- Damp gear, wet clothing, or cooking steam brought inside adds extra moisture load
- Cold hard surfaces like aluminium poles and hardshell tent lids cool faster than fabric
How Different Factors Contribute to Condensation:
| Factor | Why It Causes Condensation | Severity |
|---|---|---|
| Body heat and breathing | Constant warm, moist air released all night long | Very High |
| Elevated tent position | Cold air on all sides with no ground insulation | High |
| Closed vents | Humid air trapped inside with nowhere to exit | Very High |
| Synthetic fabric | Zero breathability, moisture pools on interior walls | High |
| Camping near water | Ambient humidity already elevated before sleep | High |
| Multiple occupants | Doubles or triples moisture load in enclosed space | Medium to High |
| Temperature swing overnight | Rapid wall cooling increases condensation rate | Medium to High |
| Wet gear inside tent | Extra moisture source beyond body respiration | Medium |
| Hardshell tent lid | Metal surface cools fastest, condensation pools there | Medium |
The real solution is not finding one magic fix. It is addressing several factors together. Start with ventilation because that is the highest impact change you can make tonight on your next trip. Open roof vents before bed, not after you notice moisture.
Keep at least two vents partially open even in cold conditions. This allows humid air to escape before it settles on your walls. Think of it like leaving a bathroom exhaust fan running. The airflow carries moisture out before it becomes a problem on your surfaces.
Next, look at your fabric. If you are serious about overlanding in Australian conditions, polycotton canvas is worth the investment. Brands like Ironman 4×4, Darche, and Oz Tent offer polycotton options that breathe significantly better than budget synthetic tents.
The weave allows moisture vapour to pass through before it becomes liquid condensation. That one material choice alone reduces your morning wipe-down time considerably on most trips.
Finally, build a quick post-camp habit. Every morning before pack-down, wipe all interior surfaces with a dry microfibre cloth. Leave vents and doors open for as long as possible. Even 20 minutes of airflow before folding makes a measurable difference to how dry your tent packs away. That single habit is the most practical and underrated condensation prevention step most RTT owners skip entirely.
What Can You Do on a Camping Trip to Reduce Condensation?
The most effective condensation fixes happen before you go to sleep, not after you wake up wet. Most campers react to moisture in the morning. The smarter move is preventing it from building overnight in the first place. Your habits on each trip matter more than the tent brand you own.
Ventilation is your biggest lever. Open roof vents before bed, not when you already notice dripping walls. Even in cold conditions, a small opening makes a significant difference to airflow inside. Stale, humid air needs an exit point to escape before it settles on cold surfaces.
Here is exactly what to do on every camping trip to reduce condensation:
- Open at least two vents before sleeping, regardless of outside temperature
- Create cross-ventilation by positioning airflow entry and exit on opposite sides
- Never cook inside the tent as steam dramatically raises interior moisture levels
- Wipe all interior surfaces with a dry microfibre cloth every single morning
- Keep wet jackets, boots, and damp gear stored outside or in the vehicle
- Air the mattress out separately before folding the tent away after breakfast
- Use silica gel moisture absorber sachets placed near the sleeping area overnight
Does Rooftop Tent Material Affect Condensation?
Absolutely it does, and this is one of the most important buying decisions you will make. The fabric your RTT is made from determines how your tent handles moisture vapour before it becomes liquid water on your walls.
Polycotton canvas is the gold standard for Australian conditions. The natural cotton fibres within the weave allow moisture vapour to migrate outward through the fabric before it condenses into droplets. Brands like Darche, Oz Tent, and Ironman 4×4 use polycotton blends for this exact reason. It is not just marketing. It genuinely performs better in humid coastal and tropical environments.
Budget RTTs made from 100% polyester or nylon offer zero breathability. Moisture hits the wall and immediately turns to liquid. You end up with noticeably wetter interiors every morning compared to a polycotton tent in identical conditions. The thread count and weave tightness also matters within canvas tents. A tighter weave improves waterproofing but slightly reduces breathability. Looser weave breathes better but needs more regular re-proofing. Knowing this helps you choose and maintain your tent correctly for your camping style and location.
Does a Roof Top Tent Mattress Cause Moisture Problems?
This one catches people completely off guard, and it is rarely discussed in RTT buying guides. Your mattress is a significant moisture source that most owners completely overlook. You sweat while sleeping. That moisture travels downward into the foam and gets trapped between the mattress base and the tent floor beneath it.
Standard high-density foam mattresses absorb perspiration steadily throughout the night. Because the underside sits flat against the tent base, that moisture has nowhere to evaporate. It just sits there in the dark. Over several trips without proper airing, this becomes a serious mould risk from below, not from the walls above.
The fix involves two things. First, use a moisture-wicking mattress topper on top of the foam. Products designed for camping or overlanding move sweat away from your body and spread it more evenly. Second, lift and air the mattress separately from the tent after each trip. Stand it upright in sunlight for at least an hour. Some aftermarket RTT mattresses now come with perforated or vented foam cores specifically designed to allow airflow underneath. These are worth considering if you camp frequently in humid Queensland or Northern Territory conditions.
How Do You Dry Out a Rooftop Tent After a Wet Night?
Packing a wet tent down and driving home is the single fastest way to create a mould problem. I have seen expensive polycotton RTTs ruined within three trips simply because the owner skipped the drying step consistently. It feels inconvenient in the morning, but the cost of replacing a canvas tent makes those extra 30 minutes worthwhile every time.
Start by opening every vent, door, and window fully after waking up. Let natural airflow move through the interior while you have breakfast and pack other gear. If the sun is out, position your vehicle so the tent faces direct sunlight. Even 20 minutes of direct morning sun removes a surprising amount of surface moisture from canvas fabric.
Wipe all interior surfaces including walls, ceiling, and the mattress top with a clean dry microfibre cloth before folding. If you genuinely cannot dry it before leaving camp, treat it as an urgent task at home. Open the tent fully within 12 hours of arriving back. Park in direct sunlight if possible. Never leave a damp RTT sealed for more than one day under any circumstances. That window is where mould colonies begin establishing themselves inside your investment.
How Should You Store a Rooftop Tent to Prevent Mould?
Long-term storage is where most mould problems actually begin, not on the camping trip itself. The tent gets packed away slightly damp, the garage door closes, and weeks pass. By the time you open it again for the next trip, the damage is already done. Proper storage habits protect your investment between every single trip.
Always store your RTT clean and completely dry before closing the lid or cover. Brush off any dirt, leaf debris, or organic matter from the exterior canvas. These materials hold moisture and accelerate mould growth if left sitting against the fabric during storage.
Choose your storage environment carefully. A sealed garage with no airflow is surprisingly risky, especially in humid coastal areas like Brisbane, Sydney, or Perth. If your garage gets warm and humid in summer, the moisture trapped inside a closed RTT has nowhere to go. Store in a well-ventilated space where air moves regularly around the tent.
Use the manufacturer’s cover but avoid sealing it completely airtight. Some breathability in storage is important for the fabric. Place two or three large silica gel moisture absorber packs inside before closing for any storage period exceeding two weeks. Check and replace those packs every couple of months during long off-season storage periods.
What Kills Mould on a Rooftop Tent Without Damaging the Fabric?
Finding mould on your RTT is frustrating, but most people make it worse by grabbing the wrong treatment. Bleach is the most common mistake. It strips the DWR waterproof coating from canvas instantly. It also breaks down the cotton fibres in polycotton weaves over time. One bleach treatment can permanently weaken fabric that would otherwise last a decade.
The good news is that safe, effective treatments are widely available across Australia. White vinegar diluted with water at a 1:1 ratio is the gentlest starting point for light surface mould. For heavier growth, canvas-specific treatments work significantly better without causing fabric damage.
Here is exactly what kills mould safely on a rooftop tent:
- Diluted white vinegar at 1:1 ratio for light surface mould spots
- Wet and Forget Outdoor spray for moderate mould without scrubbing required
- Canvak Canvas Cleaner specifically formulated for polycotton and canvas RTTs
- Fabsil Canvas Proofer applied after cleaning restores waterproof protection
- Soft bristle brush to gently remove dry mould spores before any wet treatment
- Direct sunlight after treatment to kill remaining spores naturally and completely
- Never use bleach, harsh detergents, or pressure washers on canvas fabric
Can a Tent Re-proofer or Waterproof Spray Help With Condensation?
This is one of the most misunderstood topics in the entire RTT community. People re-proof their tent hoping to fix condensation and then wonder why nothing changed. Re-proofing and managing condensation are two completely different things solving two completely different problems.
Waterproofing sprays like Scotchgard or standard DWR treatments restore the outer surface repellency of your fabric. They stop rain soaking through from outside. They do absolutely nothing to reduce moisture forming on the inside surfaces from your body heat. Applying more waterproofing to a tent with condensation problems is like putting a raincoat on indoors to stop sweating. It makes no logical sense.
What actually helps condensation is a breathability treatment, not a waterproofing spray. Nikwax Fabric and Leather Proof is a strong example. It restores breathability to canvas weaves that have become clogged with dirt and dried moisture over time. When canvas breathes properly, moisture vapour passes outward through the fibres before condensing into liquid droplets. Both treatments have a role in tent care. Re-proofing protects against external rain. Breathability treatment manages internal moisture. Understanding the difference means you apply the right product at the right time.
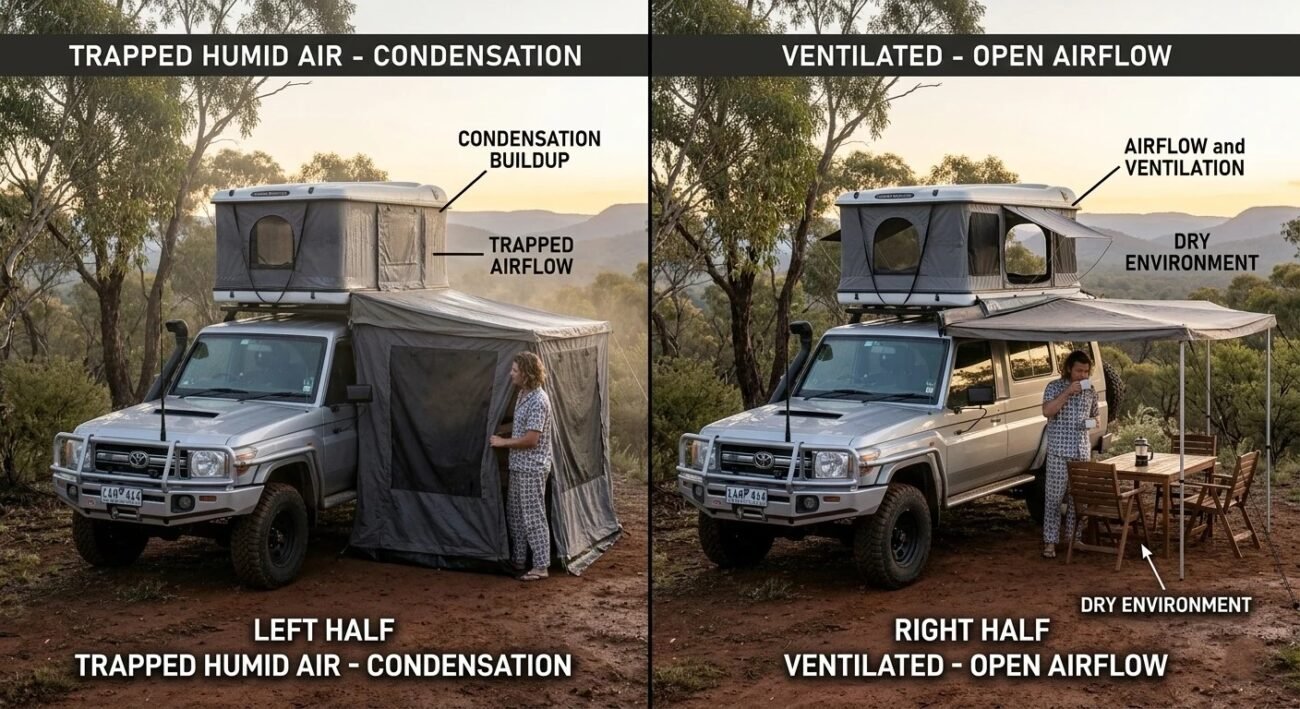
Does a RTT Annex or Awning Make Condensation Worse?
An annex can absolutely make condensation worse if it is used without thinking about airflow. When you enclose the entry area of your RTT with a full annex, you are essentially creating a sealed vestibule around the door. Humid air that would normally escape when you open your tent in the morning gets trapped in that enclosed space instead. It circulates back inside, adding to your overall moisture load overnight.
The problem is not the annex itself. The problem is sealing it completely without leaving any ground-level ventilation. In humid coastal areas like Darwin or Cairns, a fully sealed annex on a warm night can noticeably increase interior moisture levels by trapping warm, humid air directly at the tent entry point.
This is where the Rigdup 270 Degree Awning genuinely stands out as a smarter choice. Instead of enclosing the tent entry, it provides wide open 270 degree wrap-around coverage using 280gsm ripstop polycotton canvas. You get full weather protection on three sides without trapping air around your door. The integrated rain runoff poles manage water effectively without creating a sealed humid pocket. Built-in LED lighting and heavy-duty D-zippers add serious practical value to every campsite setup without compromising the airflow your tent needs overnight.
What Are the Best Rooftop Tents for Low Condensation?
Choosing the right RTT from the start saves you years of frustration managing moisture problems. The tents with the lowest condensation issues consistently share the same features. Good roof ventilation, breathable polycotton canvas, anti-condensation flooring, and quality zippers that seal properly without trapping stale air inside.
The Rigdup 1.4m Soft Shell RTT sits at the top of this list for good reason. The 320gsm ripstop polycotton canvas breathes exceptionally well in Australian conditions. Carpeted flooring with YKK zippers, a 70mm memory foam mattress, integrated solar panel, and a 260cm ladder make it one of the most complete packages available at $3,200.
For couples needing more space, the Rigdup 1.8m Hard Shell RTT delivers with an aluminium honeycomb insulated base that dramatically reduces cold surface condensation from below. The built-in anti-condensation mat, carpeted flooring, 40mm memory foam, and aerodynamic hard shell design at $3,400 make it exceptional value.
| RTT Model | Canvas Type | Anti-Condensation Feature | Best For | Price |
|---|---|---|---|---|
| Rigdup 1.4m Soft Shell | 320gsm Polycotton | Carpeted Floor + YKK Zippers | Solo and couples overlanding | $3,200 |
| Rigdup 1.8m Hard Shell | Hard Shell + Insulated Base | Anti-Condensation Mat + Honeycomb Base | Couples, cold climates | $3,400 |
| Darche Panorama 1400 | Polycotton Canvas | Mesh Ceiling Vents | Family camping | $1,599 |
| Oz Tent RV5 Plus | Polycotton Canvas | Large Roof Vent System | Extended touring | $1,999 |
| Ironman 4×4 Compu-Fold | Polycotton Canvas | Dual Ventilation Panels | Budget conscious buyers | $114 |
Warpping Up
I learned this the hard way after opening my RTT one spring morning to find dark mould spots across the canvas ceiling. One weekend of packing it away wet was all it took. That was an expensive lesson I never repeated.
Preventing condensation and mould in a rooftop tent is not complicated. It just requires consistent habits. Open your vents every night before sleep. Wipe surfaces dry every morning before pack-down. Never fold a damp tent without planning to air it within 12 hours. Store it clean, dry, and with silica gel packs inside. Use a breathability treatment like Nikwax alongside your regular waterproofing spray. Choose polycotton canvas if you camp frequently in humid Australian conditions.
None of these steps are difficult. Together they add maybe 20 minutes to your camp routine. That 20 minutes protects a tent worth thousands of dollars and keeps your sleeping space genuinely comfortable on every trip.
If you are shopping for a new RTT, look hard at the Rigdup range. The anti-condensation mat, aluminium honeycomb insulated base, and quality YKK zippers show that moisture management was built into the design from the start, not added as an afterthought.
Got questions about your specific setup or conditions? Drop them in the comments below and we will help you sort it out. Discover how to install, set up, and care for your rooftop tent in this helpful guide.
FAQs
Re-proof your canvas RTT once every 12 months under normal use. If you camp frequently in heavy rain or harsh Australian coastal conditions, re-proof every six months. Clean the canvas thoroughly before applying any re-proofing product. Dirty fabric prevents the treatment from bonding correctly to the fibres.
Small rechargeable electric dehumidifiers work well inside larger RTTs. Renewable silica gel canisters are a simpler, no-power option for most setups. Place them near the sleeping area before bed. They absorb excess moisture overnight and can be recharged at home between trips.
Cold weather increases condensation significantly. More condensation means more moisture on surfaces. If you pack the tent away without drying it, mould risk increases sharply. Alpine areas like the Snowy Mountains or Victorian High Country are particularly high-risk environments. Always allow extra drying time in cold conditions.
Spray diluted white vinegar across all interior surfaces. Let it sit for 15 minutes. Wipe with a clean cloth and leave the tent fully open in direct sunlight for several hours. Sunlight kills remaining mould spores naturally. Repeat this process if the smell persists after the first treatment.
Softshell polycotton canvas RTTs generally manage condensation better due to natural breathability. Hardshell tents offer better insulation from cold surfaces but can trap humidity if ventilation is poor. The Rigdup 1.8m Hard Shell addresses this with an anti-condensation mat and insulated aluminium honeycomb base floor.
Look for tents with multiple roof vents plus large mesh window panels on opposite sides. Cross-ventilation is essential in humid Queensland or Northern Territory summers. The Rigdup 1.4m uses quality YKK zippers that allow partial opening for precise airflow control throughout the night without fully exposing the interior.