How to Build Overland Setup for Australia? The Ultimate Solution
Most people underestimate how unforgiving the Australian outback really is. One wrong turn on the Gibb River Road with no recovery gear, no water, and a dead phone and you’re in serious trouble.
That’s exactly why building a proper overland setup for Australia means covering every base: a capable 4WD, the right suspension and tyres, dual battery power, recovery gear, remote comms, and enough fuel and water storage for the distances involved. The good news? You don’t need to spend $80,000 to do it properly.
You just need to know what actually matters out here, in what order, and why. This guide walks you through every critical piece of the build from your base vehicle and modifications to power, recovery, comms, and navigation. Whether you’re planning your first remote trip or upgrading a tired rig, you’ll find everything you need right here.
What makes overlanding in Australia different from the rest of the world?

Australia doesn’t ease you in. It throws you straight into distances that genuinely humble experienced travellers from other continents. In the United States, you’re rarely more than 150 kilometres from a town.
In outback Australia, you can be 600 kilometres from the nearest fuel stop, with no phone signal, no other vehicles, and midday temperatures pushing 45 degrees Celsius. That changes everything about how you plan and build your rig. The corrugations alone will shake bolts loose that you’d never think to check elsewhere.
American overland content talks a lot about mud and rock crawling. Australian overlanding is more about heat management, dust infiltration, long-range fuel, and what happens when something breaks three days from help. The wildlife adds another layer too. Hitting a kangaroo at dusk does serious damage to an unprepared vehicle.
Water crossings in the north can close tracks for months. You’re not just camping here. You’re operating in one of the most remote and unforgiving environments on earth, and your setup needs to reflect that honestly.
Is your vehicle actually ready for Australian overlanding?
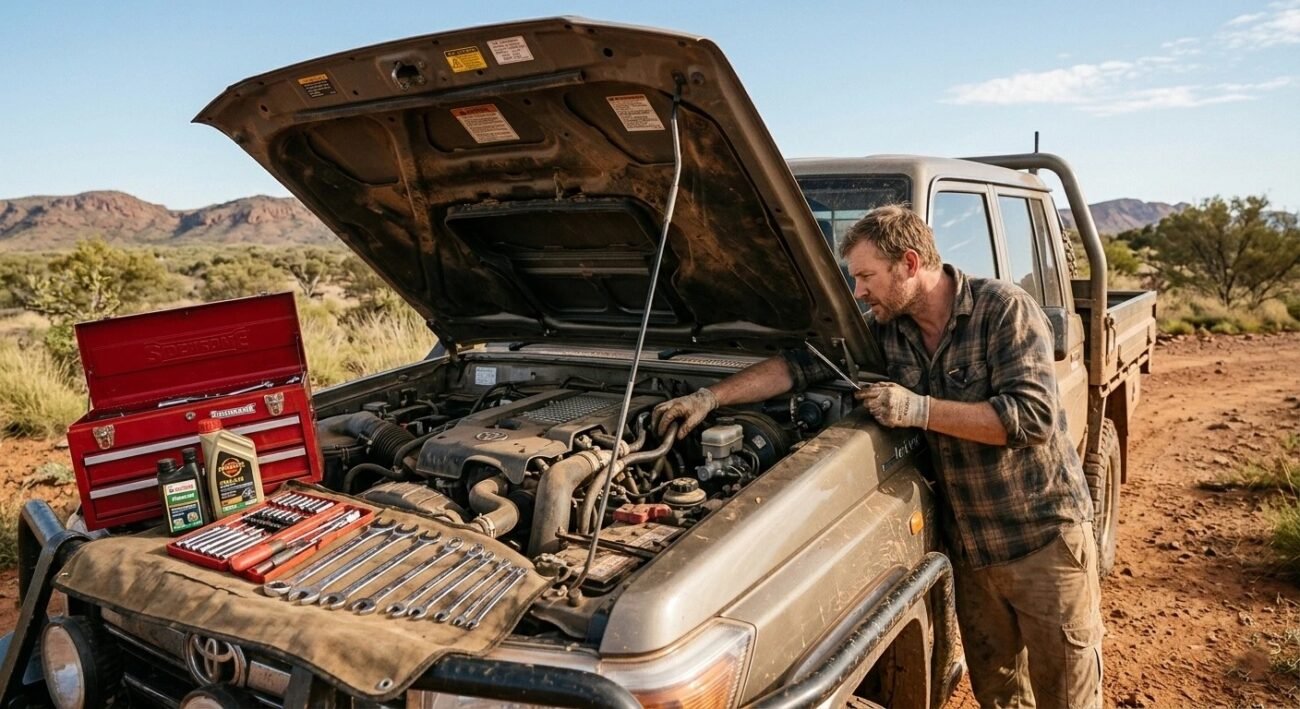
Most people think their 4WD is ready because it has a lift kit and some aggressive tyres. That’s a start, but it’s nowhere near the full picture. The first thing I always check is the cooling system. Australian heat destroys an overlooked radiator faster than any off-road obstacle will. Next, look at your diff and gearbox oils.
Manufacturers set service intervals for normal use, not 800-kilometre corrugated tracks under load. Check your wheel bearings, brake lines, and fuel lines for wear before a single kilometre of remote driving. A cracked fuel line 400 kilometres from Birdsville is a serious emergency. Your tyres need to match the terrain and your load rating, honestly, not optimistically. Overloaded tyres on hot bitumen before you even reach the dirt track is where many problems begin.
Your electrical system matters too. A weak alternator struggles to keep up with a fridge, dual battery system, and lights running simultaneously. Spend a weekend doing a proper mechanical inspection before you spend another dollar on accessories.
What should you modify first on your Rig?
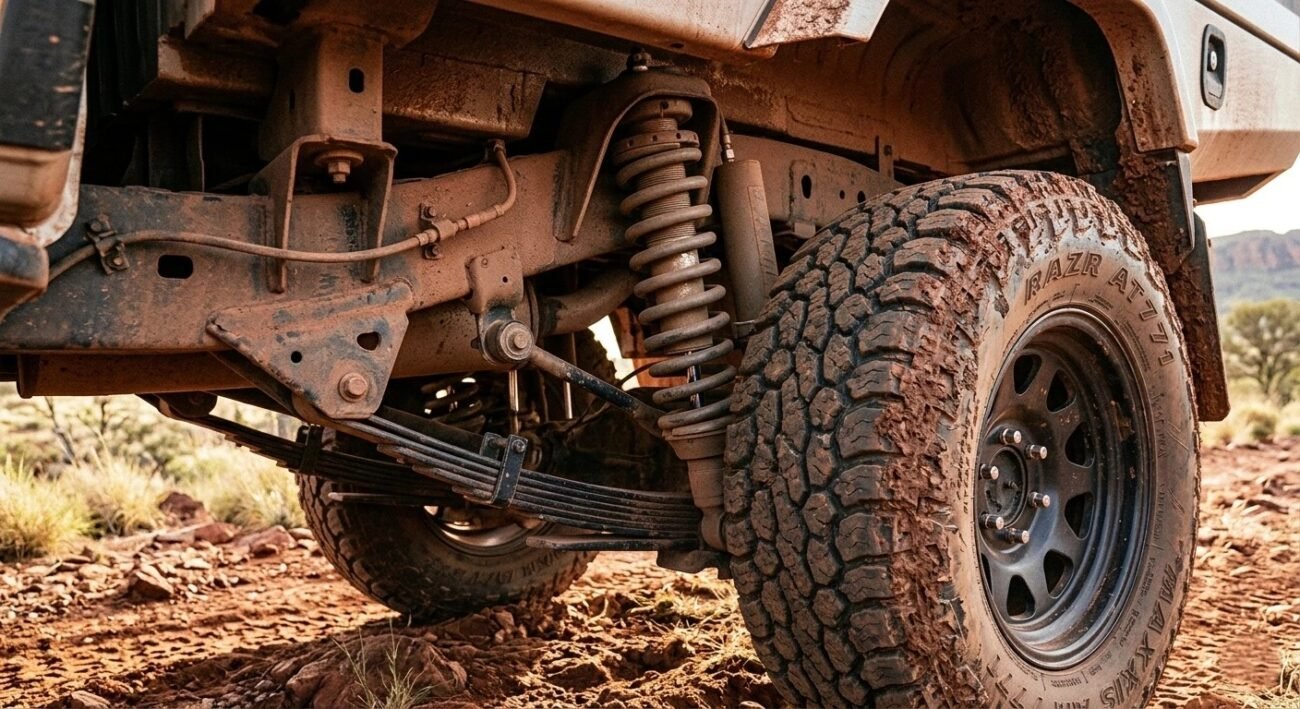
Most beginners go straight to the roof rack or the bull bar because they look the part. That’s backwards thinking, and it costs people money and reliability later. Start with your suspension.
Everything else you add puts weight on it, so it needs to come first. A quality suspension upgrade matched to your actual loaded weight changes how your vehicle handles, how your tyres wear, and how comfortable long corrugated tracks feel. After suspension, tyres are your next priority.
They’re your only contact with the ground and they affect braking, fuel consumption, and recovery situations directly. Once your vehicle sits correctly and rolls on the right rubber, then you address protection. A good bash plate under your engine and transfer case is genuinely unglamorous but absolutely critical.
After that, a dual battery system and a reliable DC-DC charger give you the power foundation everything else depends on. Lights, communication gear, and storage solutions all follow naturally once that foundation is solid. Build from the ground up, not from the outside in.
How to Set Up Your Vehicle for Overlanding in Australia?
Australia’s overlanding scene is unlike anywhere else on Earth. From the red dust of the Simpson Desert to the muddy coastal tracks of Cape York, one day you’re crawling over boulders in the Flinders Ranges, the next you’re bogged in wet season mud. Getting your rig right before you leave the bitumen isn’t optional – it’s survival.
Step-by-Step Setup Guide
Step 1 – Choose the Right Base Vehicle: You need a robust 4WD with low-range gearing and at least 200–250mm of ground clearance. The community-favourite choices in Australia are clear:
- Toyota Land Cruiser 70/300 Series – the outback legend, known for clocking 600,000km on the Tanami Track
- Toyota Hilux – Australia’s most popular workhorse, unmatched aftermarket support
- Isuzu D-MAX – praised by Aussie overlanders for durability on the Oodnadatta Track
- Nissan Patrol TD42 – a cult classic in the community (Overland Bound forums)
Step 2 – Dial In the Suspension: Australians take a practical middle ground — equipping vehicles with the correct spring rate to support their all-up weight, then dampers that adequately control how that weight moves across endless corrugations. Both should combine to create a total lift of about two inches. Don’t chase big lift; Australian regulations cap aftermarket suspension height at around 50mm per state for good safety reasons.
Step 3 – Tyres: A happy middle ground usually lands at around 33 inches. Essentially every vehicle crossing rugged outback tracks runs on 33s. Fit all-terrain tyres (e.g., BFGoodrich KO2s) and always carry a quality compressor — tyre pressure management is critical across sand, rock, and mud.
Step 4 – Fuel & Water Range: Install an aftermarket auxiliary tank or replace your existing tank for greater capacity. Carrying enough 20L jerry cans to give a range of over 1,200km means you can travel long distances off-road without worrying about fuel. Carry a minimum of 4L of water per person per day, plus a filtration system.
Step 5 – Recovery & Safety Gear:
| Gear | Purpose |
|---|---|
| Snatch strap + D-shackles | Vehicle extraction from bog/sand |
| MaxTrax/recovery boards | Self-recovery on soft terrain |
| Hi-Lift jack | Lifting on uneven surfaces |
| Satellite communicator | Most remote routes lack cellular service — satellite comms are non-negotiable |
| UHF CB Radio | Convoy and road train comms |
| First aid kit | Remote medical emergencies |
Step 6 – Power & Camp Setup: Run a dual-battery system with a DC-DC charger to power a 12V fridge, lighting, and USB points without draining your starter battery. A rooftop tent (RTT) is a favourite in the Aussie community for quick setup on corrugated tracks.
Community Pro Tips (Reddit & Forums)
“Start with the essentials – decent tyres, recovery gear, and a water tank. You’ll work out what you actually need after a couple of trips.” — @TrackTalesAU
“My first trip was a 2-night loop in SA’s Flinders Ranges. I learned more about my 4×4 than any YouTube vid could teach.” – Overlanding community
Australia-Specific Warnings
- Avoid driving at night, Australia’s wildlife is attracted by headlights, and a collision with a kangaroo or wombat can cause serious vehicle damage.
- Temperatures soar past 45°C in summer; the best seasons for desert routes are May to August.
- Always register your trip plan with local authorities before heading into remote areas.
The golden rule from 25-year veterans: reliability beats flashy modifications every time. A well-maintained stock Hilux will outlast an over-modded budget build in the Australian outback any day of the week.
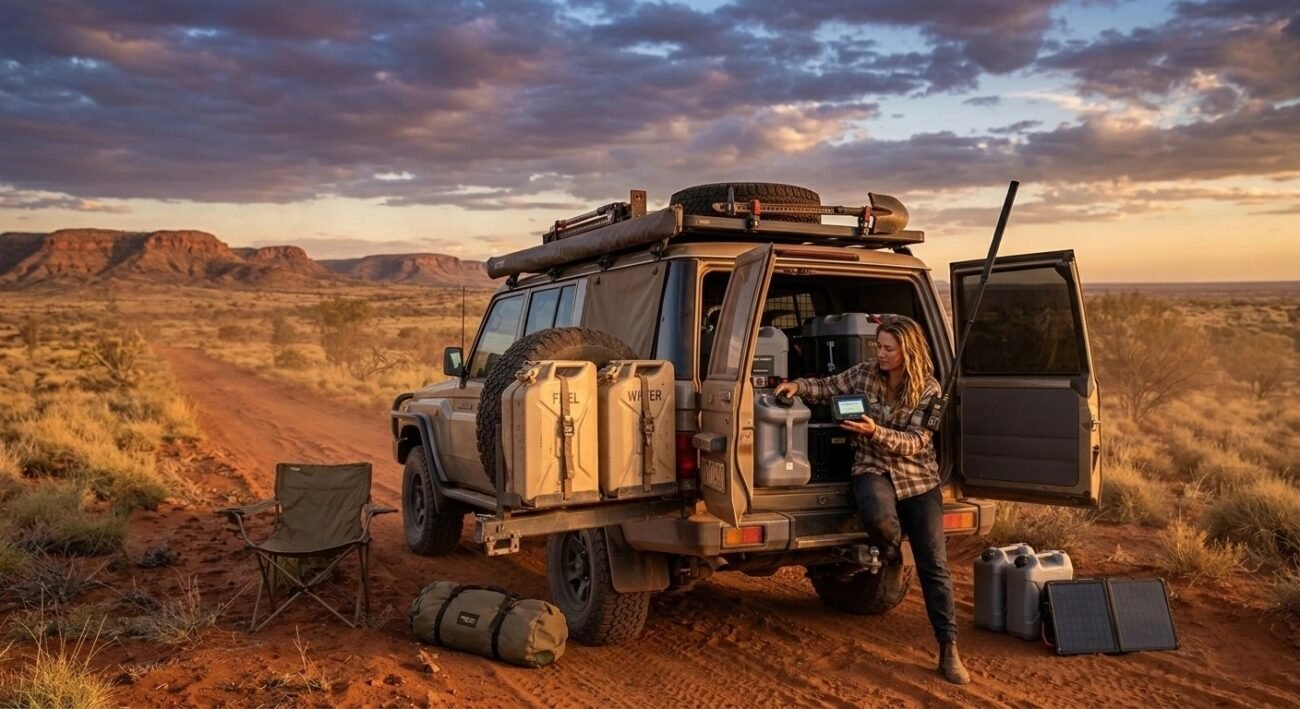
How do you set up power and electrics for extended remote travel?
Getting your power setup right the first time saves you money and frustration later. Follow this sequence and you won’t have to rewire anything twice.
- Step 1: Calculate your actual power draw List every device you’ll run. A 12V fridge draws 4 to 6 amps per hour. Add lights, phone charging, and a CPAP machine. Total your daily amp-hour consumption honestly before buying anything.
- Step 2: Size your battery bank correctly A 120Ah lithium battery is the realistic minimum for a two-person touring setup. Lithium handles Australian heat better than AGM and delivers nearly full usable capacity without damage.
- Step 3: Install a DC-DC charger Fit a Redarc BCDC1225D or Victron Orion-Tr Smart. Modern vehicles use smart alternators that won’t charge a second battery through an old voltage-sensing relay. A DC-DC charger fixes that problem completely.
- Step 4: Mount a solar panel on your roof A 160 to 200-watt panel is the sweet spot for most Australian touring setups. In clear outback conditions, it fully recharges your battery by early afternoon without driving a single kilometre.
- Step 5: Install a 12V fridge and connect accessories Run your fridge directly from the secondary battery. Use Anderson plugs for connections. They’re weatherproof, reliable, and universally understood across Australian workshops and campsites.
- Step 6: Keep your wiring simple and labelled Use a basic fuse block. Label every circuit clearly. When something fails 400 kilometres from a town, you need to find and fix the problem yourself.
How do you carry enough fuel and water for remote Australia?
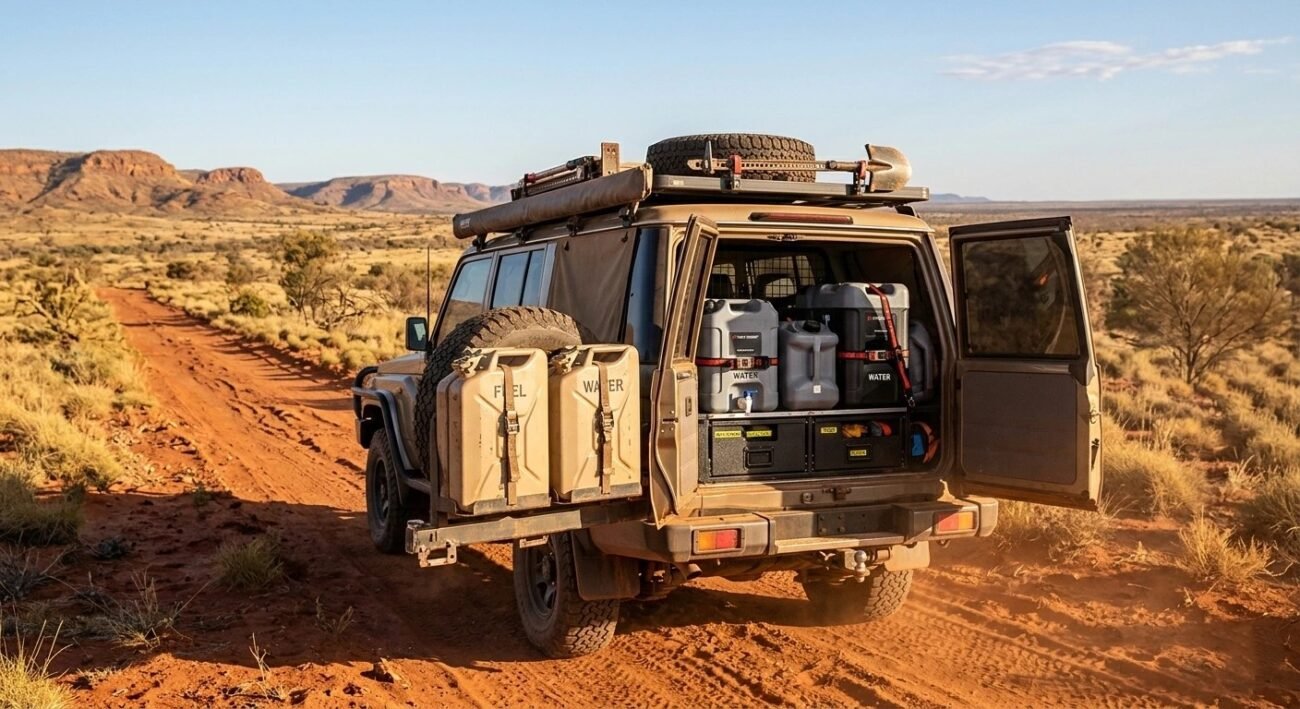
The honest answer is that most standard fuel tanks are simply not big enough for remote Australian tracks. A stock 80-litre tank gives you roughly 700 kilometres of sealed road range in a loaded 4WD.
On corrugated dirt, that drops to around 500 kilometres. The Gunbarrel Highway and Anne Beadell Highway both have gaps exceeding 500 kilometres between reliable fuel. A long-range replacement tank from Ironman or Brown Davis is the cleanest solution. It sits low, keeps your centre of gravity stable, and removes the handling risk of rooftop-mounted Jerry cans.
If a long-range tank isn’t in your budget yet, two 20-litre Jerry cans mounted low on a rear bar will cover most situations. For water, budget 10 litres per person per day as your non-negotiable baseline.
A 60-litre underslung water tank paired with a Katadyn filter covers most touring scenarios comfortably. Never rely on bore water without filtering and chemically treating it first. Remote Australian bore water carries bacteria and minerals that will make you seriously ill.
What recovery gear is non-negotiable in Australia?
The three items that cover most Australian recovery situations are a snatch strap, MaxTrax traction boards, and a quality air compressor. A snatch strap stretches under load and uses stored energy to pull a bogged vehicle free.
It’s useless without another vehicle, which is why solo travellers also need a winch. A 9,500-pound synthetic-rope winch mounted to a rated bull bar handles the situations where no other vehicle is around. Synthetic rope is safer than steel cable because it doesn’t store dangerous energy when it snaps under load.
MaxTrax boards handle sand, mud, and creek bank situations where your wheels are spinning without grip. They work alone, they’re fast to deploy, and they’ve saved countless Australian trips from turning into rescues. Beyond those three, carry a hi-lift jack, two soft shackles, a snatch block, and a tree saver strap.
A portable ARB or TJM compressor lets you air back up after dropping tyre pressure in sand. Airing down to 18 to 20 PSI in soft sand genuinely transforms traction. Never drive remote Australian tracks without the full recovery kit loaded and accessible.
How do you stay in contact when there’s no phone signal?
Your phone becomes useless fast once you leave the main highway in outback Australia. The first thing every remote traveller needs is a registered PLB (Personal Locator Beacon).
Register it with AMSA for free and it triggers a coordinated search and rescue response with one button press. That’s your non-negotiable baseline. Beyond that, a Garmin inReach Mini 2 or Zoleo satellite messenger lets you send two-way text messages from anywhere on earth. You can check in daily with someone back home without relying on any phone tower.
That regular contact is what prevents unnecessary rescue callouts when you’re just running a day behind schedule. A UHF CB radio on Channel 40 is equally important on remote Australian tracks.
It’s how you warn oncoming road trains on single-lane tracks and communicate with other travellers nearby. Some serious remote travellers also carry an HF radio for RFDS contact in genuine medical emergencies. Always leave a detailed trip plan with a trusted contact before departing. Tell them your route, campsites, and exact return date.
How do you navigate properly in the Australian outback?
Google Maps will confidently send you down a track that disappeared in a flood two years ago. That’s the reality of navigating remote Australia, and it’s why your phone is not a navigation tool out here.
The Hema Explorer app with downloaded offline maps is the Australian standard for good reason. It uses tracks sourced from real 4WD touring data, not satellite imagery interpretation. Load your maps before you leave mobile coverage completely. A dedicated Hema HX-1 Navigator unit is worth the investment on longer trips.
It runs independently of your phone battery and handles dust and vibration better than any touchscreen device. Always carry a current paper Hema map of your region as a backup.
Paper never crashes, never needs charging, and never loses its signal. Learn to read grid references before you need them in an emergency. Knowing your exact coordinates matters enormously when you’re calling for help. Cross-reference your GPS position with visible landmarks regularly. Tracks in Australia shift after wet seasons and your digital map won’t always reflect that.
How do you set up shelter and sleeping for extended overland trips?
Where and how you sleep on a remote Australian trip affects your safety, your rest, and your next day’s energy more than most people plan for. A rooftop tent is the most practical shelter option for overlanding. It sets up in under two minutes, keeps you off the ground, and sits above most insects, snakes, and flooding risk.
Always verify your roof rack’s dynamic load rating before fitting one. Most quality racks handle 80 to 100 kilograms moving and 150 to 200 kilograms stationary. A tent plus two adults can push those limits on rough tracks. In northern Australia above Broome, sleeping elevated is genuinely a safety consideration during crocodile season.
For traditional Australian touring, a heavy-duty canvas swag remains hard to beat. Darche and Dune 4WD both make excellent Australian-built options that breathe well in heat and insulate properly in cold desert nights.
A 270-degree awning is not optional in Australian summer. It creates your living space, your kitchen shade, and your shelter from afternoon sun. ARB and Ironman make reliable options that mount solidly and deploy quickly at camp.
How do you cook and handle food on a multi-week overland trip?
Food planning for a multi-week Australian overland trip is a logistics exercise, not just a shopping trip. Your 12V fridge handles fresh meat, dairy, and vegetables for the first five to seven days.
After that, you’re working from dry goods, canned food, and freeze-dried meals. Radix and Backcountry Cuisine make genuinely good freeze-dried options that only need boiling water. They’re light, compact, and surprisingly satisfying after a long day on corrugated tracks. A two-burner camp stove running 450-gram butane canisters handles most cooking tasks cleanly.
Carry a cast iron camp oven if you have the storage space. A slow-cooked damper or stew over a campfire after a hard day of driving is one of the genuinely great Australian overlanding experiences. Water-efficient cooking matters more as your water supply gets lower.
One-pot meals, minimal washing up, and reusing cooking water for washing dishes makes a real difference over two weeks. Store food in sealed containers inside your drawers. Australia’s wildlife is creative and determined when it smells an unsecured food bag left on a camp table overnight.
What does a first aid and medical setup look like for remote Australia?
A standard first aid certificate is not enough for remote Australia. I learned that the hard way after watching a friend manage a deep gash two days from the nearest hospital with nothing but a basic kit.
Remote area first aid training through providers like Remote Medical Training Australia teaches you to manage situations for hours or days before help arrives. That changes how you think about your kit completely.
Your medical kit needs wound closure with steri-strips and wound glue, not just bandages. Include a Sam splint for fractures, a tourniquet, oral rehydration sachets, broad-spectrum antibiotics prescribed by your GP before departure, and strong pain relief. Snake bite protocol in Australia has changed significantly.
You do not cut, suck, or wash the bite site. Apply a firm pressure immobilisation bandage immediately and keep the patient completely still. Carry an EpiPen if anyone in your group has known allergies. Heat stroke is the other serious risk. Know the difference between heat exhaustion and heat stroke because the treatment differs completely and getting it wrong matters enormously.
How much does a full Australian overland setup cost?
Most people dramatically underestimate the cost or panic at the full number and give up before starting. Neither approach serves you well. A functional, reliable Australian overland setup costs between $11,000 and $35,000 on top of your base vehicle.
Entry-level builds around $11,000 to $15,000 cover suspension, tyres, a basic dual battery system, recovery kit, and a shelter solution. Mid-range builds between $15,000 and $25,000 add a long-range fuel tank, quality rooftop tent, proper communications gear, and a reliable 12V fridge. Serious touring rigs pushing $35,000 and above have everything dialled in with quality brands and professional fitting throughout.
The staged approach is genuinely the smartest financial strategy. Suspension and tyres first, then power and fridge, then recovery and comms, then shelter.
You spread the cost across 12 to 18 months and learn what you actually need before spending money on things that don’t suit your travel style. Experience tells you what matters far more than any gear catalogue ever will.
What do experienced Australian overlanders do that beginners don’t?
The biggest difference after years of remote travel isn’t the gear. It’s the mindset and habits built around preparation. Experienced overlanders do a full mechanical inspection before every trip, not just the first one.
They check tyre pressures, fluid levels, wheel bearings, and all underbody bolts as a genuine ritual. One of my friend Sugrib once skipped a proper pre-trip check, assuming everything was fine. A loose underbody bolt caused issues midway – nothing major, but enough to disrupt the trip. It’s the kind of small mistake routine checks easily prevent.
They slow down on corrugated tracks intentionally. Beginners push through corrugations trying to float over them at speed. Experienced travellers know that speed on corrugations loosens every bolt, fatigues every weld, and shakes accessories off mounts within a single day.
They also plan backwards from their furthest point. Fuel, water, and food get calculated from the most remote location back to civilisation, not from home outward. That single habit prevents the majority of serious outback emergencies.
They also know when to turn back. Weather, track conditions, mechanical issues, and fatigue all count as valid reasons to change plans completely. The outback will always be there next season. That patience and respect for conditions separates the experienced from the rescued.
What are the best overland tracks in Australia to test your setup?
Every serious overland build needs progressive testing before you commit to a remote track with no exit options. Start with the Victorian High Country. Tracks like the Razorback test your suspension, tyres, and recovery kit in a forgiving environment where help is never far away. You’ll quickly discover if your rooftop tent mounts are solid and whether your power setup holds across three nights without driving.
Once your rig is proven, the Gibb River Road in Western Australia is the natural next step. It’s 660 kilometres of corrugated dirt and creek crossings that tests everything simultaneously. This is where your shelter genuinely earns its value. The Rigdup 1.4m rooftop tent handles this environment with its 320gsm ripstop poly-cotton canvas, 70mm memory foam mattress, YKK zippers, and integrated solar panel mounting bracket.
For couples or two-person setups, the Rigdup 1.8m model offers a 210 by 180 centimetre sleeping area, three built-in LED lights, and a 12V Anderson plug underneath for powering devices. Pair either tent with the Rigdup 270-degree awning for 2.5 metres of wrap-around shade coverage across your entire camp area. For proven rigs only, the Simpson Desert represents Australia’s ultimate remote overland challenge. Find the right vehicle for your setup -visit our vehicle compatibility guide.
Warpping Up
Building a proper overland setup for Australia takes planning, patience, and the right priorities. Honestly, I wish someone had told me to sort suspension and tyres first before I wasted money on a rooftop tent my stock suspension couldn’t properly handle. Everything else in your build depends on getting that foundation right.
Add your power system, recovery kit, and communications before you even think about accessories. Australia rewards overlanders who prepare honestly and punishes those who cut corners fast. I’ve seen beautifully kitted rigs get into serious trouble because the owner prioritised looks over fundamentals. The distances are real, the heat is real, and the remoteness is unlike anywhere else on earth.
Whether you’re planning the Gibb River Road or eventually tackling the Simpson Desert, your setup needs to genuinely match the challenge ahead. My personal approach has always been to build in stages, test each addition on a shorter trip, and let experience guide the next decision.
You learn more in three weekends on real tracks than in three months of forum reading. If you’re ready to start sorting your shelter, the Rigdup rooftop tent range and 270-degree awning are worth a serious look before your first trip.
FAQs
The Toyota LandCruiser 79 Series and 200 Series are the most trusted choices among Australian overlanders. The Nissan Patrol GU is a strong alternative. Both handle heat, dust, and long distances reliably. Parts availability in remote areas makes these vehicles the practical favourites across the country.
Most people build their rig over 12 to 18 months in stages. Rushing the build leads to poor decisions and wasted money. Starting with suspension and tyres, then working through power, recovery, and shelter gives you time to learn what your travel style actually needs.
A rooftop tent is not mandatory, but it makes camp life significantly easier and faster. It keeps you off the ground, away from insects, and set up in under two minutes. In northern Australia, sleeping elevated also adds a genuine safety layer in crocodile country.
Drop to around 18 to 22 PSI on soft sand and corrugated dirt tracks. Lower pressure spreads the tyre footprint wider, improving traction and comfort significantly. Always air back up to highway pressure before returning to sealed roads. An onboard air compressor makes this quick and easy.
Yes, a winch is strongly recommended for solo remote travel in Australia. Without another vehicle nearby, a snatch strap is useless when you’re seriously bogged. A 9,500-pound synthetic-rope winch mounted to a rated bull bar gives you genuine self-recovery capability anywhere on the track.
A quality 12V fridge like an Engel or ARB keeps food fresh for the first seven to ten days. After that, rely on canned food, dry goods, and freeze-dried meals. Plan your resupply points before departure. Never assume remote roadhouses will have fresh food available when you arrive.
Carry a minimum of 10 litres per person per day. A five-day remote trip for two people needs at least 100 litres before any buffer. An underslung 60-litre water tank combined with 20-litre backup Jerry cans covers most Australian touring scenarios comfortably and safely.